Free HDR Workflow: Luminance HDR + GIMP from Brackets to Final (2026)
Quick Answer: You can build a complete, zero-cost HDR workflow with two free tools: merge your bracketed shots and apply tone mapping in Luminance HDR, export a 16-bit TIFF, then finish color grading, local adjustments, and sharpening in GIMP. No Adobe subscription is needed at any step — this guide walks the full path from brackets to final image.
Why Luminance HDR + GIMP Is the Free HDR Stack
Most HDR tutorials assume you own Lightroom and Photoshop. The free alternative divides the job the way the software was designed:
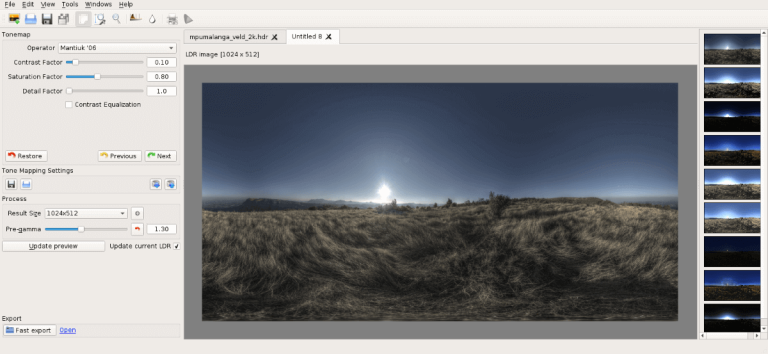
- Luminance HDR does what dedicated HDR software does best: aligns bracketed exposures, merges them into a 32-bit HDR image, and tone maps it into a viewable result with nine operators to choose from.
- GIMP takes over where HDR software stops: curves, selective color, dodging and burning, noise cleanup, and export sharpening.
Neither tool tries to do the other’s job. That separation keeps each step simple and the whole pipeline free and open source (GPL).
Step 1: Merge and Tone Map in Luminance HDR
1. Import and align your brackets
Open Luminance HDR and load your bracketed set (3–7 frames). Keep automatic alignment on, and enable anti-ghosting if anything moved between frames — see our ghosting guide for the details.
2. Choose a conservative tone mapping operator
Because GIMP will do the creative color work later, keep the tone mapping restrained here. Good starting points:
- Mantiuk ’06 — natural contrast, a solid neutral base.
- Reinhard ’05 — gentle, photographic look.
- Fattal — more local detail if the scene is flat.
Avoid the “grunge” operators at this stage; you can always push harder later, but you cannot undo baked-in halos. See natural HDR settings for starting parameters.
3. Export as 16-bit TIFF
File > Save as, and choose 16-bit TIFF. This is the critical handoff format — it preserves the smooth gradients from your 32-bit merge so GIMP has real data to work with. Our full usage guide covers the export options in depth.
Step 2: Finish in GIMP
4. Color and contrast
Open the TIFF in GIMP and work non-destructively (duplicate layers before big moves):
- Curves (Colors > Curves) for final contrast — the tone-mapped base usually needs only a gentle S-curve.
- Color Balance / Hue-Saturation for cast correction; HDR merges sometimes shift skies or skin.
- Shadows-Highlights for any last local recovery.
5. Local adjustments
Use layer masks with soft brushes for dodging and burning, or GIMP’s selection tools to lift a dark foreground without touching the sky. This is the step paid plugins charge for — masks do it free.
6. Noise and sharpening
Apply noise reduction before sharpening (GIMP’s built-in despeckle or the G’MIC plug-in), then Unsharp Mask at the very end, sized to your output: stronger for screen, gentler for print.
7. Export for delivery
Export a full-quality JPEG or PNG for web, or keep the layered XCF master. If you print, soft-proof first — see our HDR printing guide.
Format Handoff Rules (Don’t Break the Chain)
- Never hand off via JPEG. An 8-bit JPEG between the two programs throws away exactly the smooth gradients HDR was meant to preserve.
- 16-bit TIFF is the safe bridge format both programs read and write reliably.
- Keep your 32-bit HDR master (TIFF or OpenEXR) from Luminance HDR — you can re-tone-map it years later with different settings.
- Work in GIMP at 16-bit precision (Image > Precision) to avoid banding in skies.
Workflow at a Glance
| Step | Tool | What happens | Output format |
|---|---|---|---|
| 1. Merge & align | Luminance HDR | Brackets → 32-bit HDR, alignment + de-ghosting | .tif / .exr (HDR master) |
| 2. Tone map | Luminance HDR | Conservative operator (Mantiuk ’06 / Reinhard ’05) | 16-bit TIFF |
| 3. Color grade | GIMP | Curves, color balance, shadows-highlights | XCF master |
| 4. Local edits | GIMP | Layer masks, dodge & burn | XCF master |
| 5. Finish & export | GIMP | Noise reduction, sharpening, export | JPEG / PNG / TIFF |
Batching This Workflow
Shooting a whole series? Luminance HDR’s batch mode can merge and tone map dozens of bracket sets with one saved profile — export all as 16-bit TIFFs, then work through them in GIMP.
FAQs
Can GIMP do HDR merging by itself?
No. GIMP has no exposure-merging engine — it cannot align and combine bracketed shots into a 32-bit HDR image. That is exactly the job Luminance HDR exists for. The two programs divide the labor: Luminance HDR merges, GIMP polishes.
Is this workflow really 100% free?
Yes. Both Luminance HDR and GIMP are free, open-source software with no trials, watermarks, or feature-locked “pro” tiers.
Why not just export a JPEG from Luminance HDR and edit that?
A JPEG is 8-bit and already tone mapped and compressed — editing it further in GIMP risks banding and posterization, especially in skies. The 16-bit TIFF handoff keeps the gradients smooth.
Which tone mapping operator is best for a GIMP handoff?
A conservative one: Mantiuk ’06 or Reinhard ’05. The goal at this stage is a clean, neutral base — GIMP does the creative push. Save dramatic operators for images you finish entirely in Luminance HDR.
Do I need a calibrated monitor for this workflow?
It helps a lot, especially for print. A basic calibration is covered in our monitor calibration guide.
Can I use this workflow on Linux?
Yes — both programs run natively on Linux, which is one of the big advantages over paid HDR software. See our Linux setup guide.
Luminance HDR is free and open source (GPLv2). GIMP is free and open source (GPLv3).