How to Create Stunning HDR Images with Luminance HDR
You have installed Luminance HDR, but looking at the interface might feel intimidating. What is “Tone Mapping”? What do all those sliders do? Don’t worry.
In this step-by-step tutorial, we will walk through the complete workflow: from importing your RAW brackets to exporting a final, print-ready image. We will focus on creating a realistic look, avoiding the “over-processed” style that often plagues beginners.
📘 In this guide, you will learn:
- Step 1: Importing and Aligning images (Ghost removal).
- Step 2: The HDR Creation Wizard settings.
- Step 3: Mastering Tone Mapping Operators (Mantiuk vs. Fattal).
- Step 4: Saving and Exporting for Web or Print.
Haven’t installed it yet? Download Luminance HDR here first.
🎒 Gear Checklist for HDR
Before you start software processing, ensure your source photos are sharp.
- A Sturdy Tripod: Essential to prevent alignment errors. See our recommended model on Amazon →
- Fast SD Card: RAW bracketing fills buffers fast. Use a V30 or V60 card.
Import & Auto-Align Images
The foundation of a crisp HDR image lies in how well your bracketed exposures are stacked. Even a micro-movement can blur the final result. Luminance HDR has built-in tools to fix this.
A. Load Your Bracketed Photos
Click on the “New HDR Image” button in the main toolbar. Navigate to your folder and select all exposures (usually 3 to 5 images).
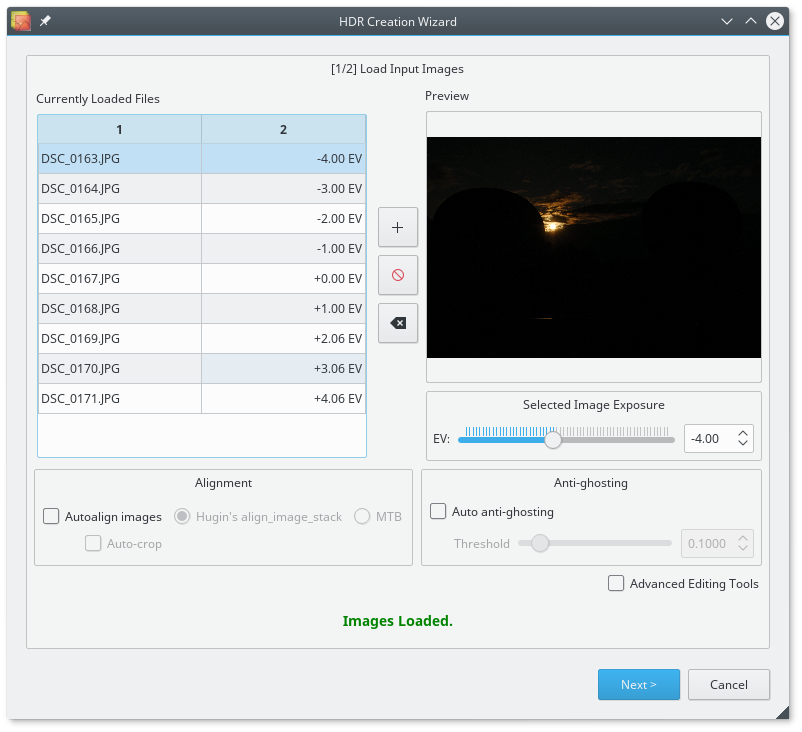
B. Enable Alignment (Crucial for Handheld)
Unless you used a heavy-duty tripod on concrete, always enable alignment. In the wizard, check the box “Align images”.
Which alignment method should I choose?
| Method | Best For… |
|---|---|
| Hugin’s align_image_stack | Recommended. Highly accurate for correcting rotation and perspective shifts. Slower but better. |
| MTB | Fast alignment for simple X/Y shifts. Use only if Hugin fails. |
C. Anti-Ghosting
Did a pedestrian walk through your shot? Or tree leaves moving in the wind? This creates “ghosts” in the final HDR.
- Auto Anti-Ghosting: Good for minor movements (rippling water, leaves).
- Manual Anti-Ghosting: If Auto fails, leave this unchecked for now. Luminance HDR allows you to manually mask out ghosts later, though it’s an advanced feature.
Click “Next” to let the software process the stack. This may take 10-30 seconds depending on image size.
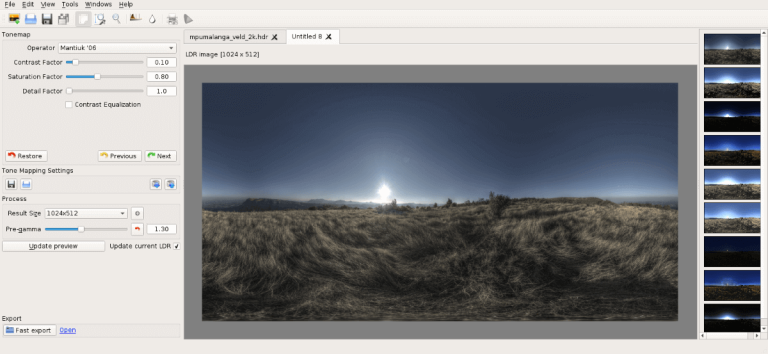
Tone Mapping: Finding Your Style
Once the images are stacked, you will see a preview that might look dark or washed out. This is raw 32-bit HDR data. To make it look good on a standard monitor, we need to apply Tone Mapping.
Luminance HDR offers over 10 different algorithms (Operators). For a beginner, this is overwhelming. Let’s simplify it. Which style are you aiming for?
Step-by-Step Adjustment
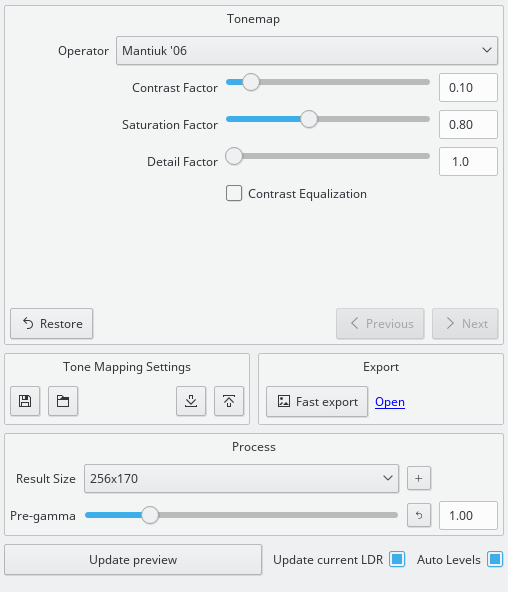
- Select the Operator: On the right sidebar, choose Mantiuk ’06 (our recommendation for first-timers).
- Adjust Comparison Preview: This is a powerful feature. Click on different thumbnails in the main window to instantly apply presets. Find one that is roughly correct.
-
Fine-tune Sliders:
- Contrast Factor: Controls the “pop”. Too high creates noise. Aim for 0.1 – 0.5.
- Saturation: HDR processing often oversaturates colors. Dial this down to 0.8 for a natural look.
- Detail Factor: Increase this to bring out textures in brick or stone.
- Click “Tone Map”: Once settings are dialed in, click the button to render the full-resolution version.
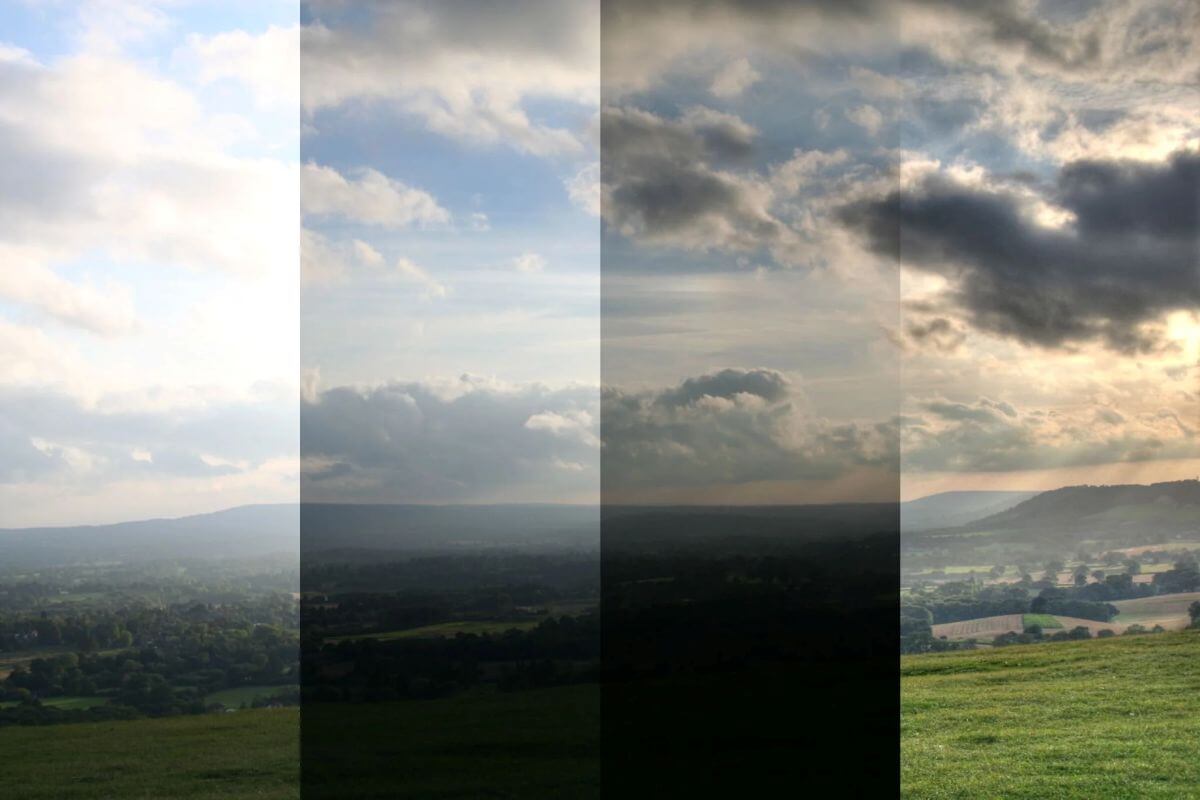
⚠️ Common Beginner Mistake: The “Halo” Effect
If you push the Contrast slider too high, you will see a glowing white outline around dark objects (like trees against the sky). This is called a “Halo”.
How to fix: Lower the Contrast Factor or switch to the Reinhard operator, which is less prone to halos.
Confused by “Mantiuk” vs “Reinhard”?
We tested all 12 operators so you don’t have to. See the side-by-side comparison.
Read the Full Operator Comparison →❌ Help! My preview is completely black or white?
This usually happens if the Pre-gamma value is incorrect. In the Tone Mapping sidebar, try adjusting the “Pre-gamma” slider to around 1.0 to 2.2. Also, ensure your input images weren’t extremely overexposed.
❓ Why does the software crash when I click “Tone Map”?
Luminance HDR is CPU-intensive. If you are processing huge 24MP+ RAW files on an older machine, you might run out of RAM. Try resizing the images to 2000px wide before importing, or close other applications.
Export & Final Polish
You have successfully tone-mapped your image. It looks great on the screen, but we need to save it correctly to preserve all that detail for the final touches.
Saving Your Masterpiece
Go to File > Save As. Here is the critical decision: which format to choose?
- TIFF (16-bit) High Recommendation. Use this if you plan to edit the photo further in Lightroom, Photoshop, or GIMP. It retains maximum color depth and allows for heavy editing without quality loss.
- JPEG Web Only. Use this only if you want to upload the image directly to Instagram or Facebook. Note that you lose significant data with JPEG compression.
The Final Polish (Don’t Skip This!)
Raw output from Luminance HDR can sometimes look a bit “flat” or noisy. This is normal. Professional HDR photographers almost always do a final pass in a regular photo editor.
1. De-Noising
Tone mapping amplifies noise (grain), especially in the sky. Use software like Lightroom or Topaz Denoise to smooth out the blue channel.
2. Sharpening
Add a touch of “Unsharp Mask” to bring back the crisp edges of buildings or rocks.
Luminance HDR creates amazing details but often leaves the sky looking “grainy”. We use Topaz DeNoise AI to save our shots. It removes grain while keeping the HDR details sharp.
See the Before/After examples here →You Did It! 🎉
You have just created your first High Dynamic Range image using free, open-source software. The result is a photo with depth and detail that a single exposure simply cannot capture.